Sunday, 10 November 2013

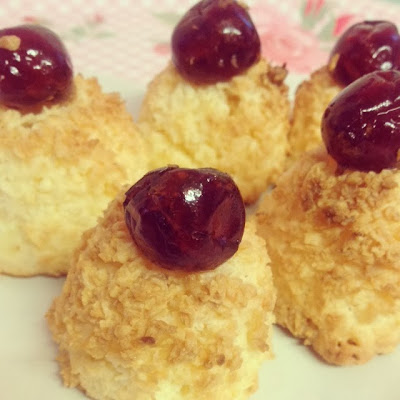
Baking with Mum - Coconut Pyramids/Macaroons

This blog post is one of my favourites, simply because it's about baking with my Mum. Now let me give you a little bit of a bio on me old mukka' (please don't tell her I called her old!) My Mum is an absolutely amaaaazing cook. She can literally whip up a masterpiece from nothing. I personally don't know how she does it. She's the type of person that'll come home from an overnight shift at work and no matter how late, or tired she is she will always cook. Thinking about it now, for the most part I've always thought my love for baking has come from my Nanny, which it has. But my kitchen habits have most definitely been handed down to me from my Mother, my ability to bake however, has not.

 
She is absolutely useless. My earliest and most fun memory of baking with my Mum is from when I was 9 and we decided to bake muffins. This is a time I always flash back to when I'm baking nowadays, particularly when I'm measuring out ingredients. Anyway when I was 9 we had decided to bake muffins, we had no scales (so we were already off to a terrible start) and we used plain flour, which haunts me to this day! Whenever I come across a cake recipe that calls for plain flour I hear 9 year old Beans saying, 'NOOOOOO! BLUE BAG! BLUE BAG!' (For those that don't know what I'm talking about Plain Flour comes in Red Bags and Self Raising in Blue.) So we baked, and we baked, I was so excited! And when the cakes came out they looked okay, they smelt amazing! We poured on our mixture of icing sugar and water, while the cakes were still hot might I add. And when we tasted them, they tasted like over salted Yorkshire puddings with sugar on top. It had gone so wrong and I still can't figure out how it went so wrong. In fact the only thing we did get right was the baking tray. We used proper muffin trays to bake so the shape was perfect and very deceiving, but the taste. The taste! Awful. Never-the-less we had fun and the experience has been added to my collection of fun memories with my best friend. 

I'd decided to give my Mum one more go and nearly a decade later we found ourselves back in the kitchen having lots of fun. This time with me in charge! I decided to choose something quite simple for us to do, this recipe doesn't call for many ingredients or much attention to be honest. It's easy and fun for any pro-baker or beginner. Plus my Mum absolutely LOVES Coconut pyramids. She used to always bring me one home in a paper bag after her rounds when she was a carer. They really are a guilty pleasure of hers and she did them justice! For someone who falls asleep at the drop of a hat and has the attention span of a cat she did so well! I was so proud, In fact at one point she was telling me that I need to pack more of the mixture together so they didn't collapse! Wit woooo, get you! Lol. 

Hope you guys enjoy this really tasty and uber simple bake courtesy of All Recipes UK. Enjoy x

Coconut Pyramids/Macaroons
Makes 12-16

My Mum kept her Pyramids simple and traditional and I covered mine with chocolate and decorated with white chocolate coloured pink. 

Ingredients 
2 free range eggs 
225g (8 oz) desiccated coconut 
150g (5 oz) caster sugar 
glace cherries to decorate
200g Milk Chocolate (for chocolate macaroons)
100g White Chocolate 

Method 
1. Preheat oven at 180 C
2. Line 1 or 2 baking trays with greaseproof paper
3. Beat eggs well then stir in the coconut and sugar
4. If you have time, leave mixture to stand for up to 20 minutes. If not, don't worry! 
5. Dip hands in cold water. Shape mixture into 'pyramids', using your hands or an eggcup as a guide.
6. Place on baking trays, decorate with glace cherries if desired. 
7. Bake at 180 C /gas 4 for 25-30 minutes or until golden. Remove from sheets and cool on a wire rack.
8. Once the Pyramids have fully cooled melt the milk and white chocolate (separately).
9. To colour the white chocolate use a colour PASTE as liquid colourings caused the chocolate to klump and lose it's smooth consistency. Add a tiny drop at a time from a toothpick or skewer. Then mix.
10. To coat the pyramid you can dip it directly into the Milk chocolate. I placed my pyramid on a fork and used a spoon to pour the chocolate. Place the coated pyramids onto greaseproof paper to set a little.
11. Scoop up the coloured chocolate with a tea spoon, let some of the excess chocolate drip off then drizzle over the coated pyramids. (Be sure to do this whilst pyramids are on greaseproof paper.)

12. Store in an airtight container to retain moisture. 


Monday, 21 October 2013

Grandad's Apple Pie

I've been dying to bake with the apples from my Grandad's apple tree, probably ever since he planted it. My Grandad was my first best friend. We did absolutely everything together, we were amazingly close and formed an unbreakable bond from the minute I was born to the day he passed away. He taught me a lot of what I know today, including gardening which is one of the things I remember us doing together so frequently. He was so very proud of his garden and he pretty much grew everything from cabbages to some of the most beautiful flowers I've ever seen. So you can imagine how much I cherish what he has a left behind. It's nice to see how strong and determined my Nanny has been in keeping his little legacy going. She's fought off everything from the nuisance children who are  also very determined to destructively pick each and every apple for no reason whatsoever to the very persistent and as it appears hungry fruit bats, who every year are very successful in nibbling away at the apples and pears. I've had my eye on the apples since very early this year and I'd wished with all of the wishes in the world that hopefully towards the end of summer I'd have enough undamaged apples to bake an apple pie with.

Well! My Nan's efforts were not in vain this year as I'd received a call from her stating she had a gift for me, so off I popped only to find a bowl full of the greenest, cutest little apples ever and I knew straight away where they were from!

I already had it in my mind that they were definitely going to be baked in a pie. Not just because they were apples, and what else could I possibly bake with them? But because before my Grandad's diabetes took a turn for the worse, we used to sit in on a Saturday afternoon, watching Westerns and old Musicals stuffing our faces with Mr Kipling's mini Apple Pies and Digestive biscuits, he'd have coffee and me, a grown up cup of tea. So how could I possibly think of baking anything else?

I have no idea what kind of apples they are so I've named them Grandad Wilson's not very creative on my part as we already have Granny Smiths, but very fitting non-the less. The apples are very juicy, crisp and sweet. The closest supermarket-bought apple I can think of is the Pink Lady (my now 2nd favourite apple), so maybe consider using a few of these in this recipe. And I've opted for Golden Caster sugar for my pastry just for something a little closer to the taste of a digestive biscuit. As you can tell I was filled with nostalgia when putting this together. I also left my pastry quite thick, as nontraditional as it may seem, I really like a little bit of a stodgy pastry and I pack my pie full of apple but do feel free to alter to your liking. Hope you enjoy it!

 Grandad's Apple Pie

Ingredients
425g Plain Flour
115g Golden Caster Sugar
3 Large (beaten) eggs
200g cubed butter (cubed)
1/2 tablespoon of Salt
1/2 Lemon zest & juice
2 tsp Cinnamon

For the filling
8 large cooking apples (try a mix of cooking apples & Pink Lady's)
2 tsp Cornflour
1 tsp Lemon juice
40g Demerara sugar (plus extra for sprinkling)
1/2 tsp Cinnamon


Method
1. Preheat oven to 170C/325F/Gas 3.
2.Sift salt, flour, cinnamon and sugar into a large mixing bowl.
3. Grate the zest of half a lemon and add to your dry ingredients.
4. Gradually add butter (make sure the butter has been in the fridge) blend together with fingertips until mixture resembles breadcrumbs.
5. Beat together 2 eggs, add to mixture gradually and beat until smooth and well combined. 
6. Lightly dust a clean surface with some Plain flour and bring the dough together further by kneading with clean hands.
7. Wrap the dough in cling film and refrigerate for 45-60minutes.
8. Once chilled, remove dough from the fridge, again on a lightly dusted (with plain flour) surface roll out your dough into a large enough diameter to cover the base and sides of your pie dish.
9. Sprinkle a little plain flour into the bottom of your pie dish. Then using your rolling pin carefully pick lift the rolled out dough and lower it into the dish. Make sure the bottom and sides are covered and be sure to press the dough into the sides of the dish. 
10. Sprinkle a little more plain flour onto the pastry.
11. Peel, core and cut your apples then cut into your desired sizes. ( I like to use a mixture of thick and thin sized apples just to add texture and a little authenticity to it's homemade look.)
12. Add your apples to a pan with lemon juice, demerara sugar and cinnamon  and mix with a wooden spoon on a medium-high heat for around 2 minutes. Be careful not to let your apples stick to the pan, if this happens reduce heat.
13. Add in cornflour give one last mix then add apples to pie dish (do not let any juice go into your dish.) Sprinkle over a little more demerara sugar.
14. Roll out the remaining dough, using heart-shaped cutters proceed to cutting out your shapes. (What I did here was use larger hearts on the outside and got smaller towards the centre.)
15. Place each heart on top of your apple mixture, brush with egg-wash and sprinkle a little more sugar.
16. Place in the oven for 35-40 minutes, or until golden brown.

Your kitchen should smell amazing within 15 minutes! I served with Salted Caramel or Caramel Latte Ice cream. This pie can also be frozen and microwaved when ready to eat. I had apple pie for pudding every night for a week!


Wednesday, 2 October 2013

Early Grey Cake

I've been meaning to put this recipe up since I baked the actual cake last weekend because I know quite a lot of Earl Grey lovers and I'm dying for them to have a go and tell me what they think of this recipe. 

I can still remember when and where I had my first cup of Earl Grey. It was during Date Day with my other half and we'd decided to go thrifting in the Northern Quarter (I love our cute days) anyway, after all of that hard work shopping we'd decided to stop for lunch at Dough where I'd ordered the tastiest pizza and a cup of Earl Grey tea. I was hooked! I enjoy Earl Grey at any time of year but I really do overdose during the colder months. I enjoy it mostly with zesty sponge cakes or really spicy food.

I wanted to bake a cake that was quite fruity with a hint of spice and a really powerful taste of the Earl Grey tea. I'd spent the most part of last Sunday looking online for a recipe that would combine the right ingredients and give me the exact flavour I was looking for. I'd found a recipe for an Earl Grey Tea Loaf on a blog by Bohemian Mama and changed a few things around just to make sure I was getting the flavours I really wanted in there. There was every chance this wasn't going to work, but I was willing to give it a go and I love a good challenge. So out came my Kidston notebook and my Hello Kitty pen (all the way from my beautiful friends in America!)

The cake turned out soooooo tasty! You can really taste the flavour of the tea and really I was surprised at that, even though I'd nearly used all of the tea bags from the box, so there was no way it wasn't going to taste of Earl Grey! It was the fruit too! They'd soaked up so much of the tea and had kept hold of that juicy, moisture. The sponge itself was just as moist and so, so tasty! The only change I'd make in this recipe is I maybe wouldn't use as much mixed peel, (if any at all) because even though I love the taste of mixed peel in cakes, it is quite strong and could potentially drown out the flavour of the tea. Plus with all zest and lemony flavour it really wasn't needed. But either way this cake is definitely one of my favourite bakes. Happy Baking.

  
 Earl Grey Cake

Ingredients
5 Earl Grey Teabags 
250g Dried Fruit (I used sultana's, raisins, currants & cranberries)
200g Golden Caster Sugar
4 Large Eggs
270g Self Raising Flour
1 unwaxed Lemon
200g softened butter
2 levelled tsp ginger
1 levelled tsp cinnamon 
275ml Boiled water
20ml milk

For the Syrup
1/2 lemon zest and juice
100g Caster Sugar
200ml water (from soaked fruit) 

Method

'I have used an old jam jar with a lid just to lock in the flavour from the teabags and lemon. If you don't have a jar you can use a bowl with cling film or any Tupperware container with a lid.' 

-Place 4 teabags into a jar/bowl then add the fruit with a pinch of lemon zest and 1/2 tsp of lemon juice.
-Place another teabag on top of the fruit and add a slice of lemon on top of the teabag. If you're using a bowl or container just add all of the ingredients together.
-Add 275ml of boiled water to the jar.
-Place the lid/clingfilm onto your jar/bowl and leave to brew for at least 2 hours. (This can be left overnight for an even stronger taste. I recommend no less than 2 hours).

-Preheat oven to 170 degrees and line baking tin (I used 6 inch, round).
-Place butter, sugar and 2 tsp lemon juice into mixing bowl and combine on a medium speed.
-Reduce to low speed, add in milk then eggs one by one. (Mixture does curdle, this is fine). Turn up speed to ensure mixture is well combined.
- In a separate bowl add flour and spices, mix together then add to the mixing bowl. Mix together on a low-medium speed.
-Drain the fruit from the brewed water (do not throw the tea away!)
-Add the fruit to the mixing bowl with 30ml of the brewed tea/water.
-Grate in 1/2 lemon zest on top of the fruit, then fold into the mixture using a wooden spoon.
-Add mixture to your selected baking tin and place in the middle of your pre-heated oven.
-Bake for 1 hour 10 minutes or until a skewer inserted into the cake comes out clean.  
(I found that during the last 20 minutes or so I had to increase the the temperature to 180 degrees. I covered the top of my cake with foil to prevent it from burning and then removed and turned back down to 170 degrees. Different ovens do vary, so do keep an eye on your cake towards the end.)
-Once the cake is cooked, leave on a wire rack to cool.


To make the syrup

'The syrup is best added to the cake whilst it is still warm/hot. I chose to add the syrup over the course of the cake's cooling period. You can use as much or as little syrup as you like. I also left my cake in the tin while adding the syrup, but because I added so much it was a little difficult to remove from the tin. Let the cake cool entirely before trying to remove, it will make it a little easier.'

- Place the 2 tea bags in a pan with the water, gently bring to the boil, removing the tea bags after a
couple of minutes.
- Add the the caster sugar and bring back to the boil without stirring, keep it on a medium heat so that you have a steady boil for a round 5-10minutes, or until the mixture has reduced by half and you have a golden syrup.
-Leave mixture to cool a little, this will thicken the syrup up and give it a real nice glossy, stickiness for the top of your cake.
- Once the cake is out of the oven (if not already) prick the cake all over with a cocktail stick or skewer and then brush the syrup all over the top of the cake. Leave to cool in the tin.
 -Once your cake has cooled completely remove from the tin. I then sprinkled mine with a little icing sugar and decorated with Viola's from my garden. 

If using flowers from a garden please ensure they are washed thoroughly and free from all pesticides.


Sunday, 22 September 2013

'Old Fashioned' Brownies

I'm back! I know, I've been gone soooo long. I've been consumed by a life of new hobbies. Since my last post I've been doing a lot of running, I have been baking but I've just not documented any of it so expect a lot of posts and recipes over the next few days. I've also been lapping up the fantastic weather we've had over July/August and I had taken up gardening too. My life has been a haven of therapeutic activity.  I'd never give up baking. Baking is my heart and it's done wonders for my tired mind and soul. However, it has been nice to indulge in a few other activities and for once I've chosen two new hobbies that have been helping me shed the pounds rather than pile it on lol. That's right I'm exactly 13lbs lighter (hooraaah!) I've even featured as a guest on my amazing friend Julie's blog where I wrote a piece on my relationship with running and baking, it's called 'You can't have your cupcake and eat it' on the super-successful blog 'The Fat Girls Guide to Running.'

Anyway back to everything food related. As you all know I LOVE baking for my other-half. He's one of my biggest fans! And as he is fast becoming a cigar and spirit connoisseur his new favourite drink being an Old Fashioned' cocktail, it set my mind to thinking about what flavoured sweet-treat I could conjure up and make for him. Please bare in mind that the first time I came across this cocktail was when he stumbled into bed drunk and all I could smell was Christmas breathing on the the back of my neck. An Old Fashioned is a combination of sugar, orange peel, aromatic bitters and Whisky. So not only is this recipe inspired by the hubby but also my love of all things Autumn/Winter. I got to thinking what flavours I would use and how they'd represent the flavours of a quite harsh but warm and spicy drink without it being to overpowering. So in this recipe I have used a good quality Natural Dark Chocolate (72%) because it's very chocolatey, which is essential for any brownie recipe, but with a bitter after-taste so this would represent the aromatic bitters. I've used orange zest which represents...? You guessed it! The fragrant orange peel used in the cocktail, a dash of Whisky, Ginger and Chilli Powder just for the added spice and a bit of a kick. The Chilli Powder really does give the brownies the warmth you get in your stomach after drinking Whisky, it's a little tingly on your tongue. Anyway less chatter, more recipe! I'd like to apologise to my friends and followers in the US for my measurements. Everything is in grams, I'm ridiculously hopeless when it comes to using cups and sticks but I promise I'll try next time :)

Old Fashioned Brownies

Ingredients
75g Plain Flour
200g Good Quality Dark Chocolate (65%-75%)
225g Butter
3 Large Eggs
175g Soft Dark Brown Sugar
80g Light Brown Muscovado Sugar
1tsp Vanilla Extract
70g Dark Chocolate Chips
2 tsp Ground Ginger
4 tsp chilli 
Medium Orange
60g Chopped Walnuts
Dash of Whisky (Balvenie)


Method
-Preheat oven to 170 degrees.
-Line baking tray.
-Melt chocolate and butter together, (I melt my chocolate in a Pyrex bowl over a pan of hot water)
-Once the chocolate and butter is melted set it to one side and let it cool slightly.
-In a large mixing bowl, or mixer combine together eggs, sugar and vanilla, gradually mix in the melted chocolate. You should have a lovely, chocolatey, paste-like mixture, quite thick in texture and smooth.
-Fold in the flour, then add in chilli powder and ginger, mix again.
-Add in the zest of 1/2 an orange, 40g of chopped walnuts, dark chocolate chips and a dash of your favourite Whisky then mix together using a wooden spoon.
-Into your lined baking tray add in 2/3 of the mixture then on top of that sprinkle the remaining walnuts and grate 1/2 of the remaining zest onto the mixture.
-Add the rest of the mixture then smooth over allowing some of the walnuts to peak through.
-Place the baking tray into the over and bake for 35-45minutes.
-Your brownies are ready when a skewer inserted comes out clean.

These brownies taste AMAZING with Salted Caramel ice cream and a little bit of honey.

And obviously everything tastes better when eaten from a heart-shaped plate!

This recipe is my own so please if you repost on your blog can you reference or provide a link please. Thank you.

Saturday, 1 June 2013

Stepping outside my comfort zone

This week has been a really busy one for me, this is why I'm updating so late. I've been baking what feels like non-stop. This week I'd been asked to create a cake that I've always avoided (until now) or I just plain don't feel comfortable doing *Cue dramatic music* a two-tiered, fully edible engagement cake (eeeeeek).

I'm usually really confident making round cakes and stacking them. But I knew there was a little more to stacking two fully-edible cakes, i.e dowels, measuring etc. I have stacked cakes before, in fact the first ever cake I had made was for my niece and it was a two-tiered princess cake, but I was (until now) only confident using one edible tier and one dummy tier. I received the message asking if I could make a two-tiered, fully edible engagement cake and my nerves were just gone. I wanted to so badly to say no but the person who asked me is super-lovely and I really didn't want to turn them down since it was a compliment in itself that I was the first person they came to. Without even thinking of the hurdles I'd have to face I accepted. After-all how hard could stacking cakes possibly be? The weeks in between making the cakes I tried not to over-face myself with thoughts of what could go wrong and in my mind the cake had already come out perfect. I had decided not to do too much research into cake stacking and to just kind of go with the flow, you know? Use my initiative. My common sense. I mean I more or less started baking using my initiative, I wasn't taught, so it was just a case of going back to basics. I knew what materials I needed and I had a rough idea of how to do it so I went ahead and did it. And it turned out better than I'd anticipated. I have to admit while my cake was in the oven I had a glance over 'The Cake Decorating Bible' by Juliet Sear of Fancy Nancy, she has wonderfully put together a few pages on how to stack cakes. I didn't read into too much detail just looked over the pictures and skimmed because I was too afraid I'd have forgotten to buy something or had the technique wrong in my head. Needless to say I overcame my hurdle and will most definitely not be letting this nor anything else get in my way again. 


Wednesday, 22 May 2013

Chocolate and Marshmallow Cupcake Recipe

Tonight I had an impulse bake, an impulse bake that I am very thankful I was semi-prepared for. My ingredients-shelf is very much full 90% of the time, for those 'just in case' moments. Unfortunately for my better half I was missing one key ingredient for this recipe and as usual I called upon him to nip to our local Tesco for some granulated sugar (he's such a hero!) I'm a bit shocked actually because sugar is one thing I have a lot of and as for granulated sugar I can't remember a time we didn't have it in. Coming to think of it, we have been trying to cut down on our sugar intake so maybe my Mum just decided to toss it out, you know, to avoid temptation. Well there'll be no hiding from temptation in any kitchen that has these yummy cuppies lying around.


This recipe is from The Primrose Bakery Book by The Primrose Bakery and in complete honesty although this was the first recipe that caught my eye, (because of the gorgeous images used in the book) I had avoided baking them for such a long time. Purely because I had a been put off baking any sort of marshmallow frosting. I thought it would involve way too much hard work. Not that I am lazy, I just like easy going and fun bakes. I've seen so many youtube tutorials of how to make marshmallow icing and it's always seemed so nightmarish. They'd completely put me off with the boiling of sugar to the perfect degree. Anyhow this recipe only calls for a few ingredients and I thought, with so little this can't be too difficult. It actually states in the book, before you start that the method to making this icing really isn't difficult at all. And The Primrose Bakery App (which is amazing) actually rates the recipes for you, this has 3 stars. So instead of avoiding this recipe like the plague, I could have been indulging in mountains of flumpy, sweet marshmallow fluff! I absolutely LOVE marshmallows (can't you tell by how many times I've said the word?) I love the stuff so much it's almost like that episode of Sabrina The Teenage Witch when Sabrina (also my name) becomes addicted to pancakes and the maple syrup lady is randomly following her around. It's exactly like that! When Ben came into the kitchen I had mallow-fluff all over my face, my hands and arms were so sticky I was sticking to my t shirt!


So in a nutshell. I love this recipe it's simple, it's tasty and I am so pleased with the fact the recipe calls for 2 eggs and says it'll make 16 cupcakes. Although I made 12 there was more than enough mixture to make 16. Same goes for the mallow icing recipe. My advice is to definitely bake your cupcakes in advance as the mallow icing is best used as soon as it's made. It's easier to work with and keeps the smooth glossiness of proper marshmallow fluff. Hope you all enjoy!

Ingredients

For the Cupcakes
115g Dark Chocolate
85g Butter
175g Soft Light Brown Sugar (I used dark brown)
2 Eggs (seperated)
185g Plain flour
3/4 tsp Baking Powder
3/4 tsp Bicarb Soda
Pinch of Salt
250ml Semi-Skimmed Milk
1tsp Vanilla Extract

Method
-Preheat oven to 190 degrees/gas mark 5 (I cooked at 160degrees.) Line muffin trays with cases.
-Melt the chocolate in a bowl over a pan of simmering water, or in the microwave. Leave to cool slightly. (I prefer to use the pan as I find I burn the chocolate to easily in the microwave. And the smell of melting chocolate on the hob just adds to the whole baking experience.)
-Cream together the butter and sugar until pale and smooth. Slowly add the egg yolks and beat well. 
-Next add in the melted chocolate and beat again.
-Sift flour, baking powder, bicarb and salt together into a separate bowl and stir together.
-Measure out milk and stir in vanilla extract.
-Gradually add alternate amounts of the flour-mix and the milk-mix to the butter and sugar, beating well in between.
-In a clean bowl using a whisk, whisk the egg-whites until they form stiff peaks. Then using a spatula carefully fold the whites into the main batter until everything is combined.
-Spoon the mixture into the cases and bake for 20-25 minutes. A skewer poked into the cakes comes out clean. 
-Leave the cakes to cool in their tins for 10 minutes then turn them onto a wire rack to cool further.

 For the Icing
120g Granulated Sugar
80g Golden Syrup
1 1/2 tbsp water
2 Egg Whites
1/2 tsp Vanilla Extract

Method
- Put the sugar, golden syrup and water into a pan and cook on a high heat for around 2 minutes. The mixture will thicken and turn golden and should slowly drip from a spoon. (The soft ball stage). 
-Whisk the egg whites until soft peaks start to form then keep beating while you slowly pour the hot sugar mixture into the bowl. 
- Continue beating at a higher speed until the mixture becomes thick, glossy and cool. Add the vanilla extract towards the end. (I added a drop of Wilton Rose food colouring at this point, then mixed in on a high speed until the icing was pale pink.)

Decorating

The mallow icing looks so cool when pallet-knifed on, I used this method and also used a large, plain piping tube (along with a piping bag) to create an even fluffier look, then topped with pink and white fondant flowers and finished with a sprinkle of edible, hologram glitter.


Tuesday, 21 May 2013

Twinkles and Sprinkles!

I've been sat here for ages trying to think of words to go with the next few pictures I want to post. I've declared to my boyfriend that I have writers block, yet I haven't put my laptop down. My head is pounding and all I want to do is stuff my face with the cherry and almond cake I made earlier. Despite my first declaration of the day to my poor boyfriend that I don't like almonds. 


So here I am typing away, the boyfriend (he has a name, it's Benjamin) who has just made his own very subtle declaration of the day stating that I don't sound like I have writers block, is completely right! I don't have writers block, I'm just over-think things. I'm guilty! I'm an over-thinker. Anyway I'm going to add a couple of photo's of my favourite cupcake creations, they are my most recent and I've simply fallen in love with them. I love using bright colours and even brighter sprinkles. I love to use glitter and hearts and the lip cutters I've recently purchased are a the perfect, cheeky addition to my selection of cutters.


Heart-Shaped Chocolatey, fudge cake

This recipe is one of my own. I decided to bake this cake for my Fiance seen as how he’s super supportive of my baking madness and he shells out a lot of money for kitchen-goods which keep me very happy. So what better way to thank him than to whip up a cake using some of his favourite flavours. I think there is a lot of science to baking and not following a recipe can make things quite complicated. It's undeniable that certain ingredients won’t work together, but ideally if you have a good base I think it’s always good to experiment with flavours and you’ll find that 9 times out of 10 it’ll turn out just right. I say this all the time, probably because it's been said to me so very often, but it really is trial and error. I often feel like George from Roald Dahl’s ‘George’s Marvellous Medicine’ when making my own recipe. There’s usually sugar in my eyes, flour all over my face, just a mess. I jot down flavours, textures, smells and most importantly how what I’m doing makes me feel at that time. Anyway, less rambling, more recipe! Here goes:

Ingredients

For the cake
4 Large Eggs
190g Butter
150g Golden Caster Sugar
40g Brown Sugar
150ml Milk (or Elmlea double cream)
1/2 tsp Baking Powder
210g Flour
30g Caramel Syrup
30g Cocoa Powder
Pinch of cinnamon

For the buttercream
140g Butter
240g Icing Sugar
15g Cocoa Powder
4 tsp Caramel Syrup
2 tsp Milk

Method
- Preheat oven at 160 degrees
-Line mould with greaseproof paper and lightly grease with butter
-Cream together syrup, butter, sugars on a high speed until you have a nice fluffy mixture  (on my notes here it says ‘Smells lovely.’ The mixture should smell like a lovely toffee, caramelly sweetness.)
-Sift in flour, baking powder, cocoa powder and cinnamon.
-Mix on a low speed adding milk/cream until you get a nice smooth mixture.
-Spoon mixture into lined mould
-Bake for 25-30 minutes or until a skewer inserted into the cake comes out clean and cake is springy to touch.
-Leave cake to cool down a little then transfer to a wire rack to cool completely.

Let’s crack on with the buttercream!

Method
-Beat butter until soft. Add half of the icing sugar and beat until smooth.
-Add remaining sugar, cocoa and milk and beat together.
-Add in caramel syrup and beat mixture until smooth and spreadable

Once the cake has fully cooled down sandwich the cake and spread a generous amount of the buttercream.
Place on top layer and sift on some icing sugar for decoration
Voila!
I got a little bit too friendly with the icing sugar!


Monday, 20 May 2013

Welcome to the wonderful world of Darling Cupcake

Hi there and welcome to my crazy, little cupcaking world. I say 'little' but with all the sugar, flour, ribbons, bows, boxes and glitter, my world as a baker isn't very small at all. I hope you enjoy this blog. I'll be posting a lot of pictures, recipes, baking methods and product reviews as I continue my journey as Miss Darling Cupcake.

Happy Monday!

x x